
Create AI video from reference images
Create short Infiknit AI video shots from reference images by separating identity, motion, framing, and review for controlled continuity.
 Luca MarinAI Video Editor
Reference images are useful only when the creator can say what each one contributes. One image may define a character’s face. Another may define the product’s shape. A third may establish the setting. Infiknit keeps those references beside the shot brief and generated candidates on a visual canvas. The goal is not to force a model to copy every pixel. The goal is to make identity, motion, and presentation explicit enough to review.
Image reference to video, consistent AI video shots, and AI video reference projects belong to the same page because they ask how to move from a still reference to an inspectable moving shot.
Short answer: Give every reference image one job, then write a short shot brief that says what moves, what stays fixed, and where the shot ends. Place the reference, brief, candidate video, and review note on Infiknit canvas nodes. Start with a short action that tests the hardest requirement: identity, product geometry, hand interaction, or camera continuity. Check the first, middle, and final frames at full size. If the subject drifts, repair the reference or simplify the movement. Do not hide an uncertain shot inside a longer continuation. Approve a stable clip before adding captions, voice, or a second shot. Keep the accepted source and settings connected for the next branch.
How should reference images be prepared for AI video?
Answer in practice: Separate the reference pack into identity and presentation. Identity includes face, hair, product geometry, label, wardrobe detail, or another trait that must survive the shot. Presentation includes lens, distance, lighting, background, pose, and movement. Put both lists in the brief before generation and state one action with one endpoint: a character turns toward camera, a hand lifts a product, or a subject reaches a mark. Review the candidate frame by frame. A smooth camera move is not a pass if the character changes, hands break, or a product label melts. If the first shot passes, save its accepted frame as a downstream reference and keep the original pack beside it. If identity is correct but presentation is weak, change presentation only; do not replace the identity evidence and lose the reason the shot worked.
What reference-to-video solves
Reference-led video fails when the reference is treated as a mood image instead of a constraint. If the shot needs a readable product mark, a face angle, or a particular prop, the source must prove that trait. If the action needs a hand, choose a frame where the hand and object are clear. The canvas gives the reviewer a place to record that requirement and to trace the candidate back to it.
Three branches for one reference pack
Use the first branch to test identity with almost no movement. Use the second to test the intended action while keeping the camera simple. Use the third to test presentation, such as a new setting or crop, after the first two pass. This order prevents a dramatic background from distracting from a subject that already drifted. It also makes the accepted branch reusable: one approved identity frame can feed a product demo, a creator-style clip, or a storyboard continuation.
Keep rejected clips when they teach a specific lesson. “Face changed during turn,” “label unreadable in close-up,” and “hand never reaches the object” are actionable notes. A generic failure label is not. When the shot is approved, save its reference, duration, format, and review status beside the output. That small record is what makes the next shot deliberate.
Treat each reference as a constraint with one job. A face reference protects identity, a product still protects geometry and label placement, and a location or style reference sets presentation. Write those jobs beside the images before generation. The first candidate should test the hardest constraint with the simplest movement; adding a new location and a complex action at the same time makes a failure impossible to diagnose.
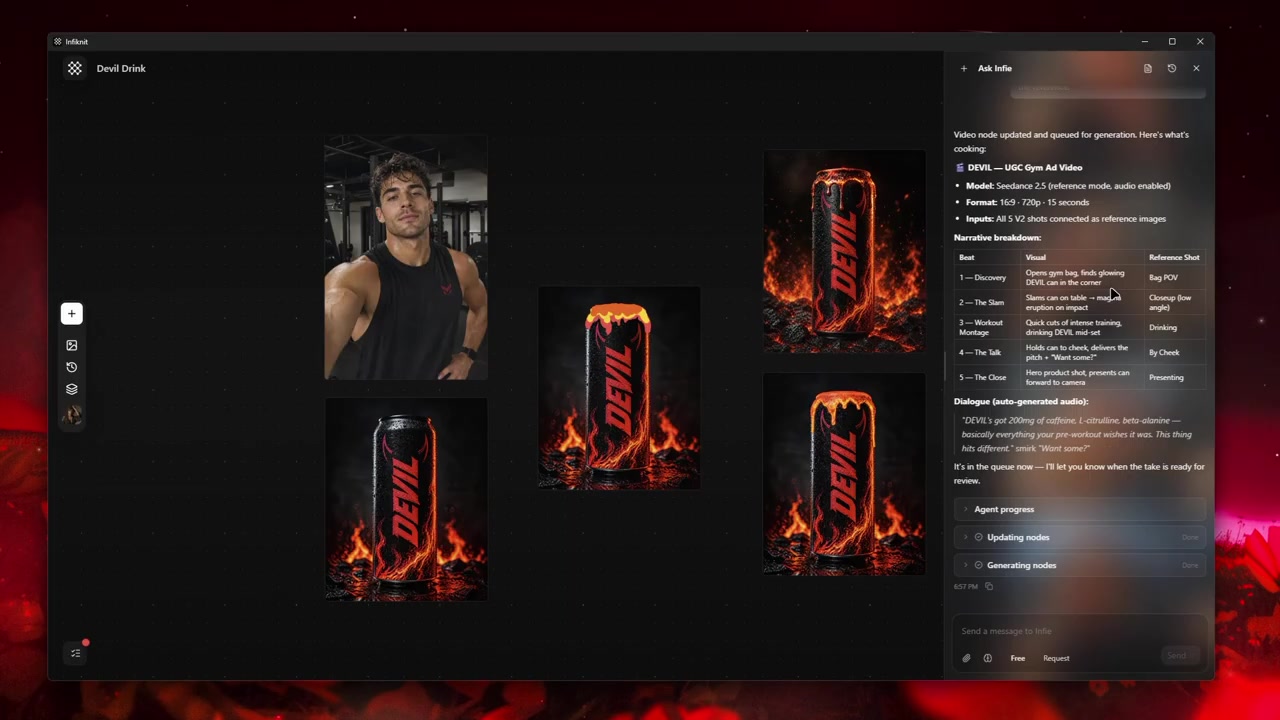
Build the smallest useful node graph
Start with five responsibilities: reference pack, shot brief, candidate, review frame, and next branch. Keep the source image and the note describing its job adjacent. Name branches by the question they test—“identity turn,” “product close-up,” or “background change”—so the accepted reference can be reused without flattening the original context.
1. Audit the reference pack
Remove duplicates and images that contradict one another. For each remaining image, write the trait it proves and the crop in which it is reliable. If a label or facial feature is too small to inspect, replace the source before generating.
2. Write one action and endpoint
State what moves, what stays fixed, and where the shot ends: “the presenter turns the jar toward camera, label remains front-facing, hold for one second.” Include duration and aspect ratio. Avoid stacking several camera moves in the first test.
3. Test identity before presentation
Generate a short, simple movement against the least distracting background. Inspect the first, middle, and final frames. If identity or geometry fails, repair the reference pack; do not compensate with a more elaborate prompt.
4. Add presentation as a separate branch
Once identity passes, test crop, lighting, camera distance, or setting one at a time. Link each candidate to the same approved identity frame so the comparison remains fair.
5. Save the accepted source frame
When a candidate passes, extract the frame that best proves continuity and keep its source references, settings, and review note. Use that frame for a later shot only after checking that its crop still supports the next action.
Decisions to record before generation
| Decision | Review question | Canvas evidence |
|---|---|---|
| Reference job | What exact trait does each image prove? | Labeled image with crop and identity or presentation note. |
| Action | What moves, what stays fixed, and where does it end? | Short brief with action, duration, and endpoint. |
| Identity test | Does the subject remain recognisable in a simple motion? | First, middle, and final-frame review. |
| Presentation branch | Which framing, lighting, or setting alternative is being tested? | Candidate linked to the same accepted identity source. |
| Handoff | Which frame is safe to reuse in the next shot? | Saved still, source pack, settings, and acceptance note. |
Choose the video route after checking the reference job. Record whether it accepts the still, any Character/Product/Style references, the required aspect ratio, duration, resolution, and reference count. If the route cannot take the complete pack, test the identity source first and keep presentation references as separate branches.
Worked example
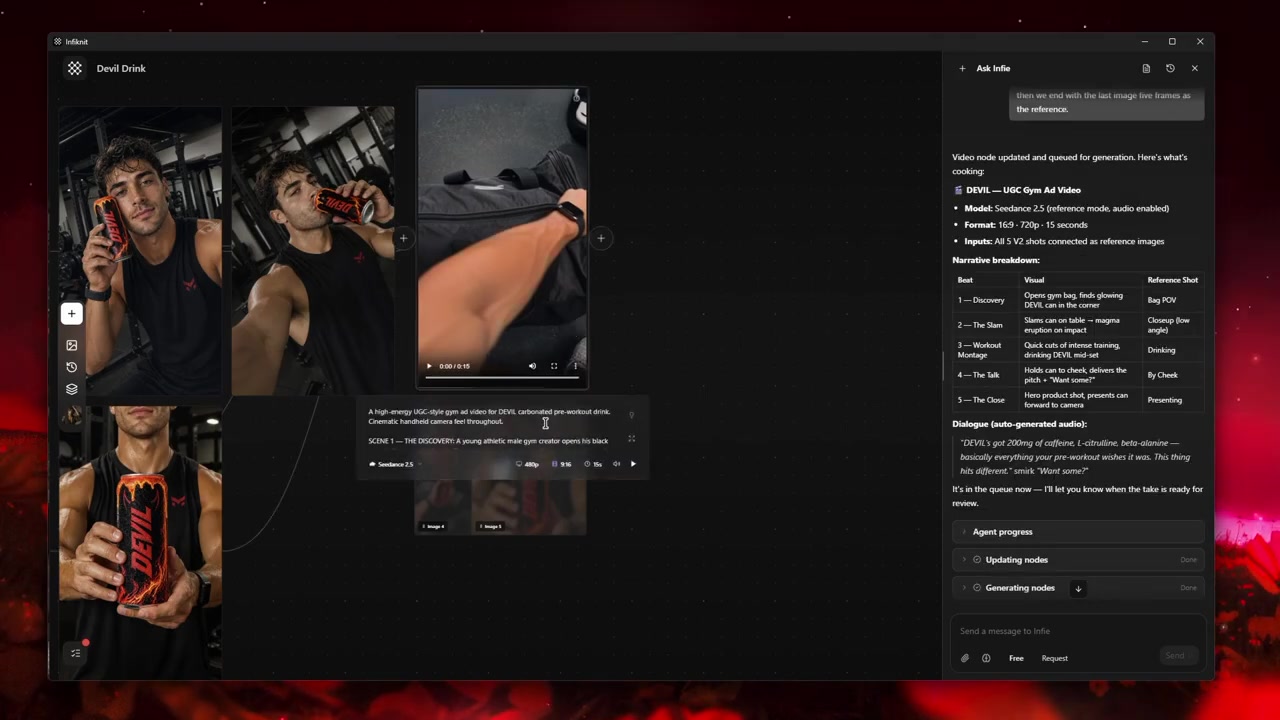
Consider a creator holding a packaged product. Use one still for the package geometry and one for the creator's face, then write “lift the package from the table, rotate it ten degrees, keep the label readable, settle at chest height.” Generate a short identity test against a plain background. After the label and hand pass, create separate branches for a closer crop and a warmer setting. The accepted branch retains its reference pack, so the next shot can reuse the same product without guessing which image was authoritative.
Keep the approved still and video candidate together, with a note stating which reference controlled identity and which variable moved. Inspect the first, middle, and final frames at the delivery crop before turning the clip into a downstream source. Retain a failed candidate when it reveals an input or motion boundary, not merely because it consumed a request.
Quality-control checklist
- Name the subject trait the reference must preserve and the single action the clip must show.
- Keep the original image, reference roles, motion brief, and candidate on separate nodes.
- Confirm input type, reference count, duration, aspect ratio, and resolution before queueing.
- Generate the shortest clip that can show the action and endpoint.
- Inspect identity and geometry before judging style or cinematic motion.
- Review first, middle, and final frames at full size and final crop.
- Keep an accepted still as a fallback source if the video drifts.
- Record which reference controlled the result and why the candidate passed.
- Use captions or audio only after the visual proof is approved.
Record the model, provider, duration, aspect ratio, resolution, and reference settings for any clip that becomes a downstream source.
Failure modes and honest limits
A clear still does not guarantee stable motion. Review the subject at three checkpoints and keep the accepted still as a fallback. If identity changes, simplify the action or repair the source before adding cinematic detail.
More references can create less control. Give each image one job and remove the least necessary input when the output becomes a hybrid. Record the removed reference so the next test is interpretable.
A route may support image-to-video but not the chosen duration or crop. Check capability before queueing and record the constraint beside the branch. Choose a compatible format instead of presenting a changed test as equivalent.
The canvas preserves the source-to-video decision, not a final edit. Captions, sound, rights, and publishing remain separate review gates after visual continuity passes.
How Infiknit supports the method
Infiknit keeps working evidence for reference image to video in the canvas. Projects preserve nodes, groups, viewport state, titles, and durable media references. Generated or uploaded media can become downstream inputs. Style, Character, Product, and Background assets can return as reference nodes. Eligible Image, Video, and Video Trim nodes can run directly or through a dependency graph.
The internal agent can connect a reference image, role-specific assets, a motion brief, and eligible video nodes through validated tools. It can queue supported image-to-video work and preserve the dependency path, but it cannot edit the resulting frames, decide whether identity passed, or approve sound and captions. Keep those observations on the candidate review.
FAQ
How many nodes should reference image to video AI use?
Start with reference image → motion brief → short video candidate → three-frame review. Add Character, Product, Style, or Background branches only when each answers a distinct continuity question. A clean still fallback is more useful than a large unreviewed graph.
What makes a reference image usable for video?
Choose an image with a clear subject, readable silhouette, and enough context for the intended camera or action. Mark what must stay fixed and what the video may change before generation.
What should be checked in the first video candidate?
Inspect subject identity, motion direction, geometry, lighting, and opening and closing frames. Reject a candidate when movement invents a product or character detail that the reference does not support.
How many reference images should one AI video shot use?
Use only the images needed to answer the shot's constraints. Start with one clear identity or product image and add a second image only when it supplies a distinct, necessary trait such as a setting or alternate angle. Contradictory references make continuity harder to review.