
Storyboard a UGC video before generation
Create a reviewable UGC storyboard before AI generation by defining proof, shots, transitions, and product constraints for cleaner production.
 Nia OkaforUGC & Social Editor
A storyboard is the cheapest place to discover that a product action cannot be shown clearly, a claim has no proof, or a transition asks too much from a generated clip. It is not a polished script and it is not a list of aesthetic adjectives. It is a map of what the viewer sees and why each shot exists.
Short answer: Define the one proof the video must show, then build a short sequence in which every shot has a purpose, source reference, action, and reject condition. Generate the risky proof shot before the decorative opening.
What should the first storyboard panel prove?
Start with the product detail or action that would make the video useful even if the opening and soundtrack were removed. Put that proof in the first panel, name the source that supports it, and write the frame that should end the shot. A board that begins with an untestable reaction gives the generator nothing concrete to preserve; a board that begins with a visible product action gives the reviewer a clear first gate.
Begin with the outcome, not the opening line
Write a sentence that names the viewer's final understanding. “The viewer sees how the lid closes before the bottle goes into a bag” is a usable outcome. “The viewer feels excited about the product” is too broad to direct production or review.
Then identify the evidence that earns that understanding. It may be a close product action, an interface state, a material detail, or a before-and-after that can actually be shown. If the product claim cannot be demonstrated in the video, decide whether the claim is supported by another approved source or whether it should not appear in the creative at all.
For a product-led workflow, start with a UGC product demo from a product image. For an entire campaign rather than one short sequence, connect the board to AI visual content creation for marketing campaigns.
Use a five-shot board when it earns its length
Five shots are enough for many short product stories, but they are not a mandatory formula. Use fewer when one action carries the idea. Use more only when each additional shot moves the viewer from one understandable idea to the next.
| Shot | Job | What must be visible | Reject if |
|---|---|---|---|
| 1. Opening | create a concrete tension | product or problem context | viewer cannot identify what the video is about |
| 2. Setup | place the product in the action | approved product identity | label, shape, or context drifts |
| 3. Proof | demonstrate the key action | hand/object interaction or screen state | action is physically unclear |
| 4. Detail | make the proof inspectable | close product or result | visual adds an unsupported feature |
| 5. Close | complete the thought | product and next step | new claim or unrelated visual appears |
The opening may be a direct product close-up, not a person speaking. The proof may arrive in the first shot. The board is successful when it makes those choices explicit, not when it looks like a film-school template.
Write shot notes that constrain the model
Each note should cover five things: subject, movement, product constraint, camera treatment, and end frame. A good note is short but testable:
Vertical medium shot. A hand removes the approved can from a gym bag and stops with the label facing camera. Keep the can silhouette and magma label unchanged. End with a stable product close-up.
This note can be attached to a canvas node alongside its product image and framing reference. It protects the things that matter without forcing every style decision into a single prompt. If the still image is approved but needs a local adjustment, see editing generated images with references and masks before making it move.
Put risk before polish
The proof action is usually the highest-risk shot: hands, labels, moving parts, liquid, screens, or a product interaction. Generate and review that first. If it fails, change the action, reference, or framing while the rest of the storyboard is still cheap to revise.
An Infiknit product-video project is a practical example. It develops a pre-workout product, requests several still directions, rejects weak hand and composition results, and uses selected framing, character, and product references for a later pass. The full UGC-style product video case study explains that evidence-led sequence. The lesson for a storyboard is simple: the board should record what needs correction before a video node is asked to animate it.
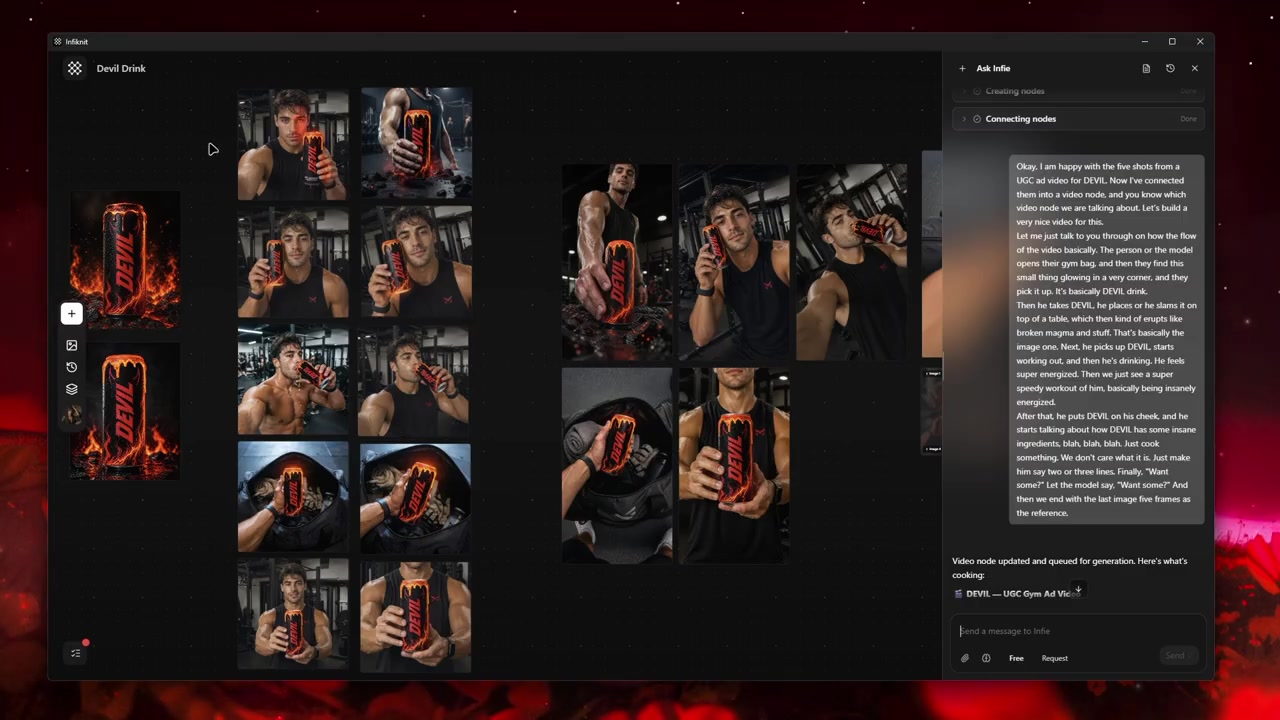
Reference and framing decision that precedes motion.
Plan transitions as causal links
A cut should answer “why this shot now?” Move from a stated friction to the product action, from the action to its detail, or from the detail to an honest next step. A jump to a new room or camera angle can work, but only when it introduces information the previous shot could not show.
Write the transition directly beneath the shot: “The product is now open, so the next close-up shows the cap mechanism.” This keeps the editor from trying to generate a complex in-between motion only because the board did not anticipate a clean cut.
For motion sourced from an approved still, use AI video from reference images. When one moment needs a longer duration, decide whether a clean cut is more truthful and controllable than continuing an uncertain generated action.
Treat format as a board decision
Portrait, square, and landscape versions are not crops applied after the fact. Each changes where the product, captions, hands, and negative space can sit. Put the intended aspect ratio beside every shot, particularly the opening and proof. If a video will appear in more than one placement, draw a distinct crop plan for each rather than assuming one composition survives all of them.
For YouTube-specific upload details, use YouTube's upload guidance alongside the shot and crop plan. Keep playback speed, caption-safe area, and export aspect ratio in each panel note.
How should creator-style shots be planned?
A creator-style storyboard can use direct address, a casual setting, or an observational hook. Write the on-camera role, product action, source reference, and final frame in the panel. Keep the presentation choice separate from the product fact: a handheld close-up can change the mood, but it does not change the product's shape, label, or approved claim.
An Infiknit recorded project is a useful reference for the sequence: it works from a product source, reviews several image candidates, selects framing, and carries the selected still into a video pass. Link the relevant source frame or timestamp beside the shot note so a reviewer can distinguish observed product evidence from a creative direction.
Hand off a board someone else can execute
The completed board should include:
- the approved product or source references;
- each shot note and its acceptance condition;
- the current aspect ratio and target placement;
- approved facts, forbidden claims, and disclosure needs;
- an audio/caption note;
- the selected branch and reviewer decision.
This gives the next creator a bounded brief. It also makes the content easier to update: a new hook, crop, or product colour becomes a documented change rather than a fresh project with no relationship to the prior version.
When the board is approved, use planning creator-style short-form videos to turn it into a compact production plan, then use UGC ad hooks and controlled variations to test openings without changing the proof.
Make the board a review conversation, not a handoff artifact
Invite the person responsible for product accuracy, copy, and final delivery to review the board before generation. They do not need to approve a visual style in the abstract. They need to answer practical questions: which product view is current, which claim is allowed, which action would be misleading, and what happens if the intended proof does not render clearly.
Capture those answers beside the relevant shot. That keeps revisions local. A brand reviewer can update a product reference without rewriting the editor's transition plan; an editor can shorten a cut without changing an approved feature claim. The board therefore improves both creative quality and auditability.
For related source control, use organising a reusable AI creative asset library and best methods for consistent batch AI images. Keep any claim decision beside the relevant panel and review the final copy against the product source before export.
Decide when the storyboard is ready to generate
The board is ready when a producer can point to a reference for every detail that must remain stable, describe each action in ordinary language, and name the review condition that would reject the shot. It is not ready because every box contains text. If the proof action is still vague, run a narrow image experiment first and bring the result back into the board.
That readiness check prevents a team from treating generation as brainstorming. The board should reduce uncertainty before compute and editing time are spent. It can remain compact: a product-led three-shot sequence with an honest close is often more useful than a ten-shot outline full of transitions no one can explain.
After the first approved production pass, update the board with what was learned. A difficult hand interaction may become a product close-up; a weak transition may become a clean edit. This keeps the next version grounded in observed production limits rather than repeating the same untested assumptions.
Review every shot twice.
When is a UGC storyboard ready to generate?
It is ready when every shot has a source, one observable action, a target format, and a reject condition. A producer should be able to point to the exact panel that protects a product detail and the exact panel that introduces a new creative variable. If those answers are missing, shorten the board or run a small still test before committing to a full sequence.