
Create a UGC product demo from a product image
Plan an AI-assisted UGC product demonstration from an approved image with visible proof and reviewable decisions for short-form content.
 Nia OkaforUGC & Social Editor
A product image can be the most dependable starting point for a UGC-style demo because it establishes the thing a viewer is meant to inspect. The task is not to make the product “look viral.” It is to show one believable action while keeping the approved shape, label, materials, and claims intact.
Short answer: Use an approved product image as the non-negotiable reference, choose one visible proof action, create a still version of that action, and only generate motion after the still passes review. Keep the creator, setting, hook, and caption as separate decisions so they cannot overwrite the product truth.
What should a product demo prove first?
Choose the one action a viewer needs to understand before adding a personality or setting. A lid can open, a pump can dispense, a screen can show a state change, or a product can be placed in its intended context. Put that action and its reject condition beside the approved image. The first still should make the action legible without sound; motion is a later test of timing and continuity.
Start with a proof moment
The useful centre of a product demo is a moment a viewer can verify. For a bottle, it may be opening a lid, pouring, or fitting it into a bag. For a skincare product, it may be dispensing the texture. For software, it is a screen action that actually happens in the product. A vague instruction such as “make a convincing creator demo” leaves the model to invent the proof, which is where factual and visual drift begins.
Write the proof as a sentence with a pass condition:
A hand lifts the can from a gym bag, with the approved magma label facing camera; the shot fails if the can shape, label, hand contact, or lid changes.
That is close to a decision shown in an Infiknit project: a pre-workout can needed to stay recognisable while the project explored a bag shot, a close product shot, and a person-led frame. Weak hands and less useful compositions were rejected before selected frames were sent to video. See the detailed UGC-style product-video case study for the full sequence.
Build a reference pack that survives review
Put the product source first. Then add only the references that genuinely constrain the intended shot.
| Item | Why it is separate | Review question |
|---|---|---|
| Approved product image | protects logo, proportions, colours and materials | does the candidate still show the approved product? |
| Action note | tells the shot what must happen | can a person understand the action at a glance? |
| Environment reference | sets location and mood | does it support, rather than obscure, the product? |
| Character or hand reference | helps with person-specific framing | does it introduce a misleading identity or endorsement? |
| Claim sheet | limits copy to approved facts | does text or voice say only what can be substantiated? |
This pack is useful even when the final asset is not generated. It tells an editor or creator what must not change. For a library of approved product material, see how to organise a reusable AI creative asset library.
Choose a camera position that explains the action
The camera should serve the proof. A close crop is appropriate when the viewer must inspect a cap, texture, or product detail. A medium shot is useful when the action needs a person and object in the same frame. A wide shot is only useful when the setting proves something the product close-up cannot.
Do not begin with a style adjective. Begin with where the viewer's attention has to land. If a product must be legible, leave enough clean space around it. If the action is the proof, do not cover it with dramatic motion or captions. If a scene needs a different angle, create that angle as a framing reference instead of asking the product reference to do both jobs.
The recorded project demonstrates this distinction when an initially straight image is cropped and rotated before becoming a reference for a later generation. The rotation was a framing decision, not a product redesign. This is a useful pattern for generating image variations from reference images: preserve the reliable input and change only the variable under review.
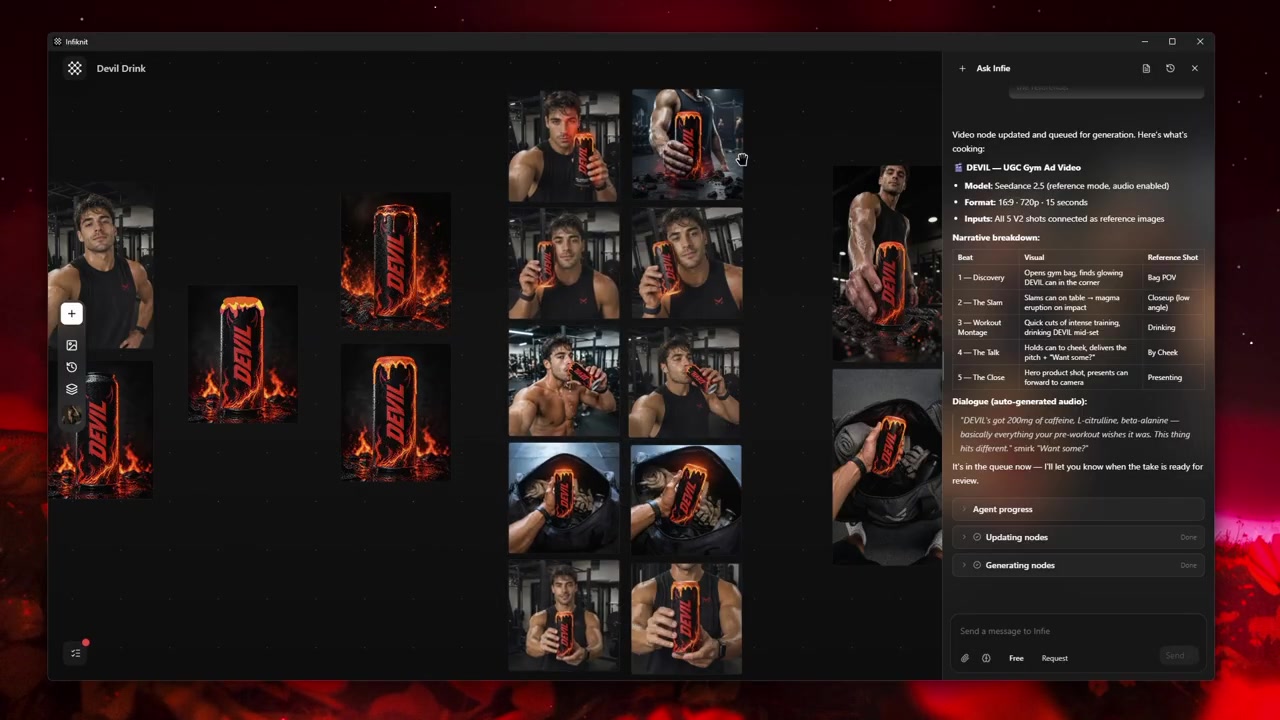
Image review before a product still is used as a motion source.
Make three directions, not three random outputs
Three directions are enough to compare a product demo without creating an unreviewable pile of assets. Give each direction a different proof job.
- Use moment: the product is opened, applied, lifted, or used.
- Detail moment: the camera shows the label, texture, interface, or key component.
- Context moment: the product appears where the buyer expects to use it.
Keep the product source and claim sheet fixed across all three. Change only the camera, action, or setting. Then record what each direction is intended to answer. “Which one looks best?” is not a useful review question. “Which one makes the cap action understandable without audio?” is.
For a full sequence rather than a single demonstration, plan the order in storyboarding UGC video before generation. For multiple hooks against the same approved proof shot, use UGC ad hooks and variations.
Review the still image before making it move
Motion can hide defects for a moment, but it cannot correct the product identity that a still already got wrong. Review the candidate at full size first:
- Compare the outline, logo placement, colours, and materials with the original product image.
- Inspect fingers, grips, reflections, and contact points when a hand is involved.
- Check whether the claimed action is physically understandable.
- Read every generated label or on-screen word; do not assume it is correct.
- Check that the final setting, product action, and hook support the intended story.
If the product is right but the composition is weak, crop or adjust the framing. If the composition is right but the product drifts, simplify the references and regenerate from the approved source. Edit generated images with references and masks is the appropriate next step for a local correction; replacing the whole prompt is not always necessary.
Add motion with a narrow instruction
An image-to-video request should describe one action and one ending. “Lift the can from the bag, keep the label forward, end with the can held still” gives the reviewer a meaningful target. “Make an energetic product video” does not.
Choose output format after deciding where the asset will live. Vertical video needs a different safe area from a 16:9 product-page video. A social platform's current placement requirements can change, so confirm them in the platform's documentation before export rather than copying a specification from an old creative brief. YouTube's upload guidance is one example of a source to check for the actual destination.
Keep an accepted still as the source for every motion attempt. If a candidate introduces a new label, an impossible hand action, or a different product, reject that motion branch and return to the still—not to a more elaborate prompt.
How should the creator treatment be written?
UGC-style means the pacing, handheld framing, direct address, or lived-in setting can resemble creator content. Keep the production handoff concrete: name the product action, the required product detail, the intended line, and the closing frame. Attach the approved product source and the relevant recorded sequence when it is the reference for the shot. The presentation can feel casual while the product detail and visible proof remain reviewable.
Final handoff
The handoff should let a reviewer recreate the selected version without guessing:
- product source and version;
- proof action and what would make it fail;
- selected still and selected motion output;
- crop, format, and intended placement;
- approved copy and required disclosures;
- review notes on anything the next editor must preserve.
That record turns one product image into a repeatable source for new formats without confusing an unapproved variation for a product fact. If you need a sequence of stills before video, continue with turning a storyboard into consistent AI video scenes.
Recover when the product changes between frames
Do not solve every failure with a longer prompt. Classify it first. A label, logo, or material change is a product-identity failure: return to the approved pack shot and reduce competing references. A strange hand or implausible action is an action failure: simplify the motion or choose a product-led crop that does not ask the model to perform that action. A weak frame with an accurate product is a composition failure: change framing, not the product source.
When is the demo ready for a new variation?
Keep the accepted still and its proof note fixed until the motion branch passes. Start a new variation only when the next question is different—such as a new camera distance, setting, or opening—not because the first branch needs another random output. This keeps product identity, creator treatment, and delivery format separate enough to diagnose the next result.
This is why an image-to-video demo needs visible branches. It makes the corrective decision inspectable and prevents a good product reference from being replaced by an attractive but inaccurate candidate. The OpenAI image-generation guide is also useful background when a production team needs to distinguish image generation from a targeted editing step; current provider capabilities must still be checked in the application.
Save the approved proof frame
After the final review, keep one still that communicates the product action without motion. It is the fastest way to check whether a later crop, hook, or platform version still tells the same story. A clear proof frame can also become a thumbnail, a product-page insert, or the opening source for another short. Record the frame’s intended use and preserve the product reference that supported it so the next variation begins from the same visual truth.
For a related process, see extracting, freezing, and reusing frames from video and controlling first and last frames in AI video. Both reinforce the same handoff principle: approve the source state before asking a later node to change it.